Finish account setup
The four-screen wizard that blocks the app on your first sign-in, field by field, plus how to reopen it later.
The first time a Provider Network Admin signs in, a wizard covers the whole app and will not let go until four screens are done: Account, Address, Payment and Policies.
Questions people ask about this page
How do I close this and look around first?
You cannot. Clicking outside the dialog does nothing for network roles. The only exit is the red Log out link at the bottom, which asks Log out? — You will need to sign back in to continue onboarding. Finishing takes about three minutes; logging out just moves the same wizard to your next sign-in.
I only got two screens, not four. Did something break?
No. For a Provider Network Admin the wizard hides steps that are already satisfied. Address disappears when your network already has a complete business address, and Payment disappears unless your invitation carried plan pricing. Account and Policies always appear.
Is the Payment step my patients' card processing?
No, and this is the single most common mix-up. The wizard's Payment screen is titled GEN Health billing — it is the card your network pays GEN Health with. The processor that takes patient money is configured later at left menu → Billing. See Patient payment processor.
Can I skip the Payment step?
Yes. That step alone has a Skip for now action, and skipping counts as complete for the wizard. Nothing else can be skipped. Add the card later at /settings/account-billing — a failed platform fee puts a red banner on your dashboard.
Why does the Address step mention OnlyScripts?
Because that address is what the pharmacy network uses to register your prescribers. The screen says so: This physical location is used when registering providers with OnlyScripts. A wrong address here breaks pharmacy enrolment weeks later, and the failure will not look like an address problem.
Can I see the wizard again after I finish it?
Yes. Click your name in the bottom-left sidebar to open Edit Account Information, scroll to the Onboarding section, and click Review onboarding. It reopens every step with your answers filled in, and the exit link becomes Close instead of Log out.
The last screen offers three shortcuts and one of them 404s. Which?
Configure your network branding. It points at /settings#network-branding, which lands on the Settings menu rather than the branding page. The real route is /settings/branding.
Where to find it
It finds you. The wizard opens over whatever page you were sent to, on first sign-in and on every sign-in after that until it is complete. To reopen it deliberately: sidebar → your name (Open account settings) → Edit Account Information → Onboarding → Review onboarding. Visible to: Provider Network Admin. Providers and Provider Delegates get their own, different wizards.
The short version
Type your name and phone
Three fields. Click the primary button to move on.
Enter the clinic's physical address
Get this right — pharmacies use it.
Add a card, or click Skip for now
This is your GEN Health bill, not patient checkout.
Tick three policy boxes and click Complete Setup
Then Close the completion screen and you are in.
What is on this page
| What you see | What it does |
|---|---|
| Dialog title (screen readers) | Complete Your Account Setup / Please complete the following steps to finish setting up your account. |
| Step dots, centred in the footer between Back and the primary button | One small dot per step; the current one stretches into a coloured bar. The dots carry no visible labels — nothing on screen tells you the step is called Account or Payment, and there is no visible "step 2 of 4" counter anywhere. Only a screen reader hears it, as Step 2 of 4: Address. Dots for steps you do not need are not rendered at all, so a three-step wizard shows three dots. |
| Screen title, top of the dialog | The only reliable way to tell which step you are on: Account Setup, Business address, Payment information, Policies and agreements. |
| Screen title and subtitle | Changes per step. Listed in full below. |
| Primary button, bottom right | Continue, Save and continue, or Complete Setup depending on the step. |
| Back | Returns to the previous step. Present on every step after the first. |
| Skip for now | Only on Payment. |
| Log out | Red link. The only way out without finishing. |
Every field, screen by screen
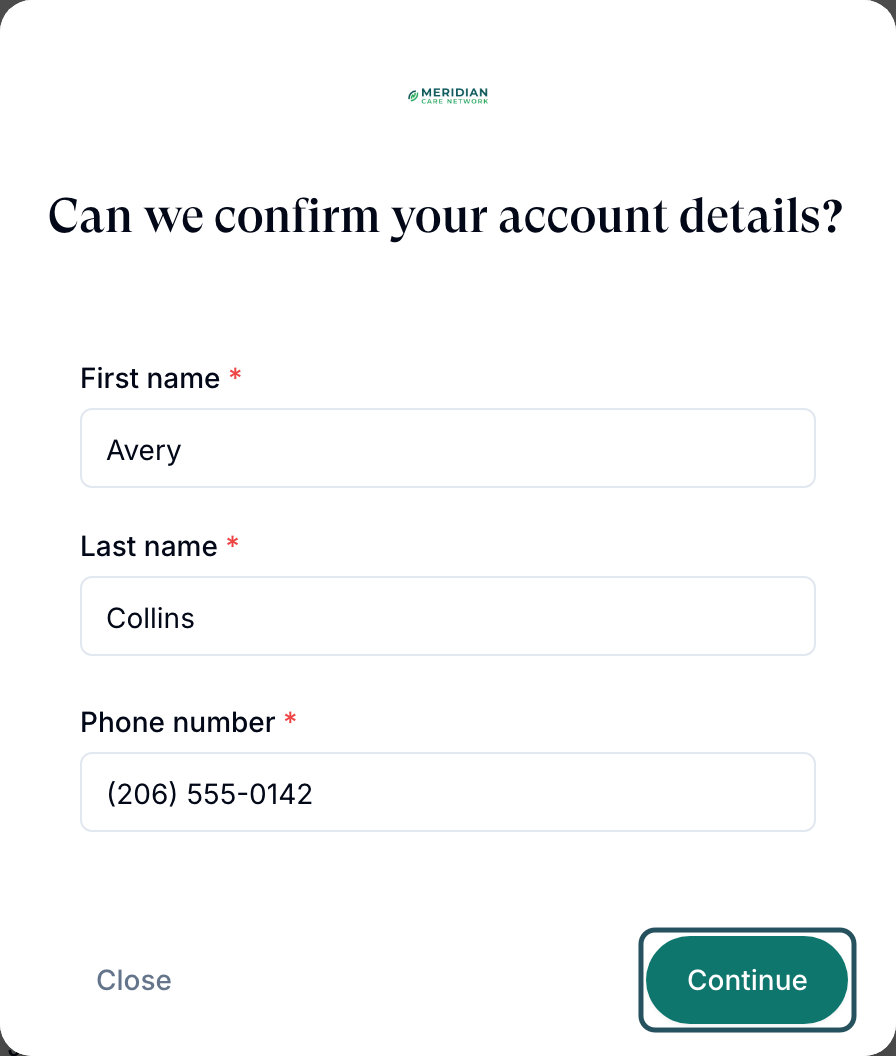
1. Account — "Account Setup"
Subtitle: Confirm the profile details needed for your network admin account.
| Field | Control | Required |
|---|---|---|
| First Name * | Text, placeholder First name | Yes — error toast First name is required |
| Last Name * | Text, placeholder Last name | Yes — error toast Last name is required |
| Phone Number * | Phone input with a country selector | Yes — error toast Phone number is required |
There is no email field. The wizard confirms the address your invitation was sent to. If that address cannot be read you get Your account email is unavailable. Please refresh and try again.
2. Address — "Business address"
Subtitle: Enter the physical location used for provider registration. On-screen note: This physical location is used when registering providers with OnlyScripts.
| Field | Control | Required |
|---|---|---|
| Street address * | Text | Yes |
| Apt, suite, etc. (optional) | Text | No |
| City * | Text | Yes |
| State * | Two-letter state select, AL to DC | Yes |
| ZIP code * | Text | Yes |
Buttons: Save and continue and Back. No skip. The same address is editable afterwards at /settings/overview under Business address.
3. Payment — "Payment information"
Subtitle: Add the GEN Health platform billing method for your provider network plan. The card inside is headed GEN Health billing / Add the payment method used for your provider network plan. It runs its own three numbered sub-steps: 1 Contact, 2 Billing address, 3 Card. Continue advances the sub-step first and only then the wizard.
| Field | Control | Required |
|---|---|---|
| Billing first name * | Text | Yes, to save a card |
| Billing last name * | Text | Yes, to save a card |
| Street address, Apt, suite, etc. (optional), City, State, ZIP code | Billing address block | Yes, to save a card |
| Card number *, Exp *, CVC * | Secure card fields | Yes, to save a card |
Buttons: Continue, Back, Skip for now. Success toast: Billing information saved. Leaving the contact sub-step blank shows First name is required and Last name is required under the fields. This step is only required at all when your invitation carried plan terms.
4. Policies — "Policies and agreements"
Subtitle on the step: Review and accept the required agreements before entering your workspace. Heading inside the card: Policies and agreements / Review and accept the required platform policies before entering the workspace.
| Checkbox | What you are agreeing to |
|---|---|
| Terms and Conditions | I have read and agree to the Terms and Conditions that govern use of this workspace. Carries a Review Terms and Conditions link. |
| Privacy Policy | I have read and agree to the Privacy Policy and understand how information is handled. Carries a Review Privacy Policy link. |
| HIPAA and business associate obligations | A long acknowledgement that you are responsible for HIPAA compliance and for executing business associate agreements where the law requires them. No review link. |
The primary button is Complete Setup and stays disabled until all three are ticked. Every acceptance is written to a permanent record you can read later at /settings/account-billing → View agreements.
5. Complete — "Onboarding Complete!"
Subtitle: Your account is ready. Below it a Quick start block: Jump to a task below, or use Close to go to your dashboard.
| Shortcut | Detail line | Where it goes |
|---|---|---|
| Invite providers to your network | Open Providers to add and manage your clinical team. | /providers — correct |
| Set up intake forms for your patients | Create and publish forms your network assigns to patients. | /forms — correct |
| Configure your network branding | Logo, colors, and display name in Settings. | /settings#network-branding — lands on the Settings menu, not the branding page |
The only button is Close, which drops you on /dashboard.
How to finish it
Fill in Account
Type First Name *, Last Name * and Phone Number *. Click the primary button.
Enter the clinic address
Use the physical location, not a PO box or a mail drop. Click Save and continue.
Add the GEN Health card, or skip
Fill the billing name, address and card fields and click Continue, or click Skip for now and add it later.
Accept all three policies
Tick every box. Complete Setup becomes clickable only when all three are on.
Track where you are by the screen title
The footer dots are unlabelled and there is no visible step counter, so read the heading: the last step before the completion screen is Policies and agreements.
Close the completion screen
Use Invite providers to your network if you want to start there, or Close to land on the dashboard.
Go straight to operating hours
Open /settings/overview and set the Timezone and Network Hours. Nobody can set availability until you do.
Statuses you will see here
| Status | What it means | What to do |
|---|---|---|
| A short grey dot behind the coloured bar | A step you have already passed. Completed steps do not reappear on the next sign-in. There is no tick, no label and no count. | Nothing. |
| The step is missing entirely | The requirement is already satisfied — a complete network address, or an invitation with no plan terms. | Nothing. Use Review onboarding later if you want to see it. |
Onboarding badge on your row in /providers or the Users table | Someone's wizard is unfinished. They cannot work. | Send them a magic link from their row. |
| Pending on a teammate's row | The invitation was sent but never opened, so the wizard has not started. | Row action Send magic link. |
What can go wrong
| What you see | Why | Fix |
|---|---|---|
| Clicking outside the wizard does nothing and there is no X | Intentional. For network roles the dialog blocks the app. | Finish it, or use the red Log out link. |
| You clicked Configure your network branding on the last screen and landed on a list of settings cards | That shortcut points at /settings#network-branding. The real branding page is /settings/branding. | Click the Branding card, or go to /settings/branding directly. |
| You added a card in the wizard and patients still cannot pay | The wizard card is your GEN Health bill. Patient checkout is a separate processor. | Open left menu → Billing. See Patient payment processor. |
| You skipped payment and now see Your latest platform fee failed to process. | No card on file when the fee ran. The banner warns about account suspension. | Click Update payment method on the banner, or fix it at Account and billing. |
| Provider pharmacy enrolment fails weeks later | The business address you typed here is wrong or incomplete. | Correct it at /settings/overview → Business address, then re-run the pharmacy enrolment. |
| Complete Setup stays greyed out | One of the three policy checkboxes is not ticked. The HIPAA one is long and easy to scroll past. | Scroll the card and tick all three. |
| A provider tells you they are stuck in a wizard with nine steps | They are. Providers have a much longer wizard than you do. | See What each provider must complete. |
| You want to redo the wizard but there is no button on the dashboard | The replay lives in your account settings, not on the dashboard. | Sidebar → your name → Edit Account Information → Onboarding → Review onboarding. In replay the exit link is Close, not Log out. |
Next
Was this helpful?