Put checkout on your own website
Sell from your own site: paste a checkout link into a button, embed hosted checkout, or build every screen against the API.
Three ways to sell from your own website: paste a checkout link into a button, embed GEN Health's hosted checkout, or build every screen yourself against the API.
Questions people ask about this page
I have no developer. Can I still do this?
Yes — option 1 needs no code. Copy a product's checkout link from /products and paste it into a button on your site. Options 2 and 3 need a developer.
Where exactly is the checkout link?
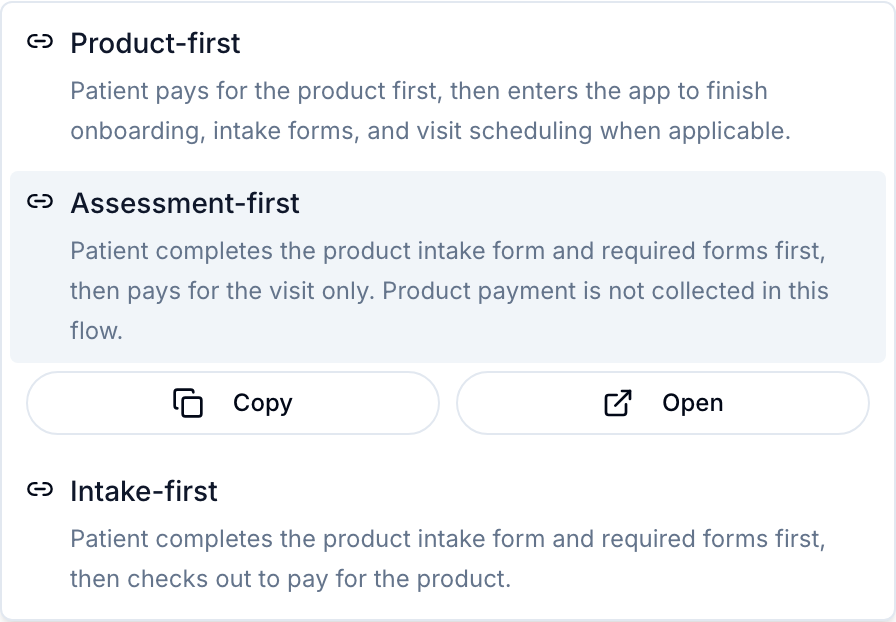
On /products, each row has a small link icon whose label is Checkout links for {product name}. Opening it gives three flavours — Product-first, Assessment-first, Intake-first — each with a Copy and an Open control.
Which of the three links should I use?
Product-first charges for the product first, then onboarding and intake. Assessment-first collects the intake first and charges only for the visit — the product is paid later. Intake-first collects the intake first, then charges for the product. Each menu entry states this in full on screen.
My link opens but no card is ever charged. Why?
Your payment processor is set to None, whose tile subtitle reads "Test mode — no real charges". Set a real processor on Settings → Payments before you share the link. This is the state people call "demo mode"; hosted checkout does not support it at all.
The checkout-link icon is greyed out.
The product is inactive. The tooltip reads "Activate this product before sharing checkout links." — or "Activate this package before sharing checkout links." for a package. Activate it from the row menu.
Does a hidden product still sell through a link?
Yes. The Storefront checkbox only controls browsing. Its tooltip says so: "Controls only whether an active product appears in the patient storefront. Direct checkout links stay available." A hidden-but-active product is exactly how you run a link-only offer.
Can I see which ad sent a patient?
Add UTM tags to the checkout link you paste into your button. They travel with the order.
Do I need a custom domain first?
No. Any website on any address can hold a button that points at your checkout link. A custom domain only changes what the checkout page's address looks like.
Where to find it
Two pages are involved. Checkout links: left menu → Products, route /products, the link icon on each row. Keys, webhooks, and the developer documentation: left menu → Settings → Developers, route /settings/developers. Visible to: Client Admin. Client Staff can copy checkout links but cannot reach the Developers tab.
What is on this page
| What you see | What it does |
|---|---|
| Link icon on a product row, labelled Checkout links for {product name} | Opens a menu of three checkout flows, each with Copy and Open. |
| Product-first | "Patient pays for the product first, then enters the app to finish onboarding, intake forms, and visit scheduling when applicable." |
| Assessment-first | "Patient completes the product intake form and required forms first, then pays for the visit only. Product payment is not collected in this flow." |
| Intake-first | "Patient completes the product intake form and required forms first, then checks out to pay for the product." |
| Copy toast | Product-first URL copied to clipboard — and the equivalents for the other two. |
| Documentation button on Settings → Developers | Opens your developer documentation in a new browser tab at /{your-client-id}/api-docs. The page carries your logo and the word Developers, and has six tabs: V2 API, V2 Guide, V1 API, Webhooks, Hosted Checkout, Patient Migration. Send the link to your developer — it needs no sign-in. |
| Quick link Hosted checkout & SDK | "Embed checkout and mount the SDK." Opens the public docs at the hosted-checkout section. |
Option 1 — Paste a checkout link into a button
Make sure the product is active
On /products, confirm the row does not read Inactive. If it does, open the row menu and click Activate.
Open the checkout-links menu
Click the link icon on the row. Its screen-reader label is Checkout links for {product name}.
Pick the flow you want
Read the three descriptions and choose. If you are unsure, Product-first is the conventional storefront behaviour.
Copy the URL
Click the copy control beside your chosen flow. A toast confirms it, for example Product-first URL copied to clipboard.
Paste it into a button on your site
In your website builder, add a button and set its link to the URL you copied. In Wix, add a Button and set the link to a web address. In Squarespace, add a Button block. In WordPress, add a Button block and paste into the link field. Any builder works — you only need a button with a URL.
Add UTM tags if you run ads
Append them to the URL you paste, for example ?utm_source=meta&utm_campaign=spring. They travel with the order.
Test it as a patient before you publish
Open the live page in a private window and click the button. You should land on your branded checkout. Do not share the link until that works.
Check your processor first. If Settings → Payments has the processor set to None ("Test mode — no real charges"), the link opens and completes without ever taking money. See Connect your patient payment processor.
Option 2 — Hosted checkout on your own page
Your site keeps its own design and hands the payment step to a GEN Health page — either by redirecting to it, or by embedding it in an iframe. Your developer does this; the docs call the two shapes redirect and embed.
Create a storefront key
Settings → Developers → API keys → Create key → Storefront key ("Public key for checkout embeds."). Copy it from the Copy your key now dialog — it is shown once.
Allow-list your website
On the new key's row menu, choose Edit origins and enter every origin your checkout page is served from, comma separated. Until you do, the row shows No allowed origins in amber and the Overview tile reads Needs setup.
Hand the developer the docs
Click Documentation — it opens in a new browser tab — and read the Hosted Checkout tab. It covers the launch choice ("Choose how to launch checkout"), the iframe contract ("Embed checkout"), and the session endpoint POST /v2/client/storefront/checkout/sessions, which is called with the X-Storefront-Key header before each checkout.
Handle the browser events
The embed posts messages to the parent page: gen.checkout.ready, gen.checkout.resize, gen.checkout.success, gen.checkout.error, gen.checkout.continue. The docs' guidance is explicit — use these for immediate UI updates and webhooks for durable backend state.
Check the launch requirements
The Before you go live section states them: for an affiliate account the payment processor belongs to the provider network; for Review Only and Review + Prescribe it must be configured on the client; and "Hosted Checkout does not support demo mode."
Option 3 — Mount checkout with the SDK, or build it all yourself
The SDK sits between options 1 and 2 in effort: your own React or plain-JavaScript page mounts the checkout runtime directly. The docs' SDK section shows a GenHealthCheckout component for React and a mountGenHealthCheckout call for everything else, each taking your client id, a clientProductId, and a storefront key, with onSuccess and onContinue callbacks.
Building every screen yourself means calling the V2 client API from your own backend with a server key. That is the V2 API and V2 Guide tabs of the documentation page that the Documentation button opens in a new browser tab, plus webhooks so your system learns about payments, forms, reviews, and prescriptions as they happen.
Never put a server key in a web page. The rule from the docs: "Use a storefront key in browser code. Never expose X-API-Key client-side." A leaked server key can read and write your whole account.
Which option to choose
| Option | What the patient sees | What you need | Effort |
|---|---|---|---|
| 1 — Checkout link | Your site, then a GEN Health checkout page carrying your branding. | An active product and a button. | Minutes. |
| 2 — Hosted checkout | Your site throughout, with checkout embedded in the page or a short redirect. | A storefront key, allowed origins, and a developer. | Days. |
| 3 — SDK or full API build | Only your own screens. | A storefront key for the SDK, or a server key and webhooks for a full build. | Weeks. |
You can start with option 1 and move up later. Products, prices, and links keep working — nothing is thrown away.
Every setting on this page
| Setting | What it controls | Default |
|---|---|---|
| Product Active / Inactive (row menu) | An inactive product's checkout links are disabled. | Active on creation |
Storefront checkbox (config view on /products) | Whether an active product appears in the browsable storefront. Direct links work either way. | On |
| Checkout flow — Product-first / Assessment-first / Intake-first | Chosen per link, not saved on the product. The flow is carried in the URL. | Product-first is the plain URL |
| Storefront key Edit origins | Which web origins may use the key for hosted checkout or the SDK. | Empty (No allowed origins) |
| Theme parameters on an embed | Optional appearance controls the docs list: accentColor, backgroundColor, textColor, borderRadius, logoMode. | Unset — your portal branding applies |
| Return controls on an embed | successUrl, cancelUrl, returnUrl — only needed when your app wants control back at a specific destination. | Unset |
Statuses you will see here
| Status | What it means | What to do |
|---|---|---|
| Inactive (product sub-line) | The product cannot be sold and its checkout links are disabled. | Activate it from the row menu. |
| Hidden from storefront | Active but not browsable. Links still work. | Nothing, if that is deliberate. |
| No badge, but patients never see the product | A network product with no customer price never reaches the patient storefront, and nothing on screen says so. | Set a price in the products config view. |
| Needs setup (Developers → Overview → Storefront tile) | Hosted checkout and the SDK are not usable yet. | Create a storefront key and add allowed origins. |
| Ready (same tile) | Hosted checkout and the SDK are usable. | Nothing. |
| No allowed origins (amber, under a storefront key) | The key has no origin restriction configured. | Edit origins and add your site. |
| Not configured (payment processor) | No processor is set, so nothing can be charged. | Configure one on Settings → Payments. |
What can go wrong
| What you see | Why | Fix |
|---|---|---|
| The button works but no money arrives | The processor is None, the test-mode choice. | Configure a real processor and re-test with a small live order. |
| The link 404s or shows nothing | The product was deactivated or deleted after you copied the link. | Re-copy from an active row. |
| The checkout looks unbranded | Branding has not been set, or the embed is overriding it with theme parameters. | Check Settings → Branding, then the embed's theme options. |
| An embedded iframe stays blank | The storefront key is missing, revoked, or the page's origin is not on the key's allow-list. | Confirm the key status is Active and the origin matches exactly, protocol included. |
| A 422 when creating a checkout session | Per the docs, merchant or processor configuration is incomplete. | Finish payment setup for the owner of the payments — the client, or the provider network on an affiliate account. |
| The iframe has nested scrollbars | The page is ignoring the gen.checkout.resize event. | Handle the event and set the iframe height from it. |
| Your backend never learns about a sale | Browser events are immediate but not durable; there is no webhook endpoint configured. | Add an endpoint on Settings → Developers → Webhooks. See Settings — Developers. |
| You want to preview checkout as an operator | There is no operator-facing checkout preview. Opening a copied link is the only way to see it. | Use the Open control in the checkout-links menu. |
Next
Was this helpful?