
Billing
Connect Stripe, NMI, Authorize.Net, Square or another processor so patients can pay, leave test mode, switch processors, turn on Apple Pay, and check whether a patient paid.
Billing is where you connect the payment processor that charges your patients and check every charge it took. Left menu → Billing. Client Admin only. Affiliate accounts see only Transaction History, because their provider network's processor takes the payments.
What you can do here
- Connect your payment processor
- Switch processors, or go back to test mode
- Show payment instructions instead of a card form
- Turn on Apple Pay (NMI only)
- Check whether a patient paid
Connect your payment processor
Use this before your first real patient pays. Until then the None tile is active: Test mode — no real charges.
Get your keys
Copy them from your own processor account; each dialog links to it under Need your API keys?. Never paste keys into a ticket or chat.
Open the tile
In Payment processor, click Edit on your processor's tile.
Paste the keys
Fill every field not marked Optional (see the table below).
Test
Click Test connection and fix anything it reports.
Save
Click Verify and save.
Make it live
Click Activate on the tile.
You'll know it worked when the tile gets a green outline and check mark, and None loses it.
Who can do this: Client Admin.
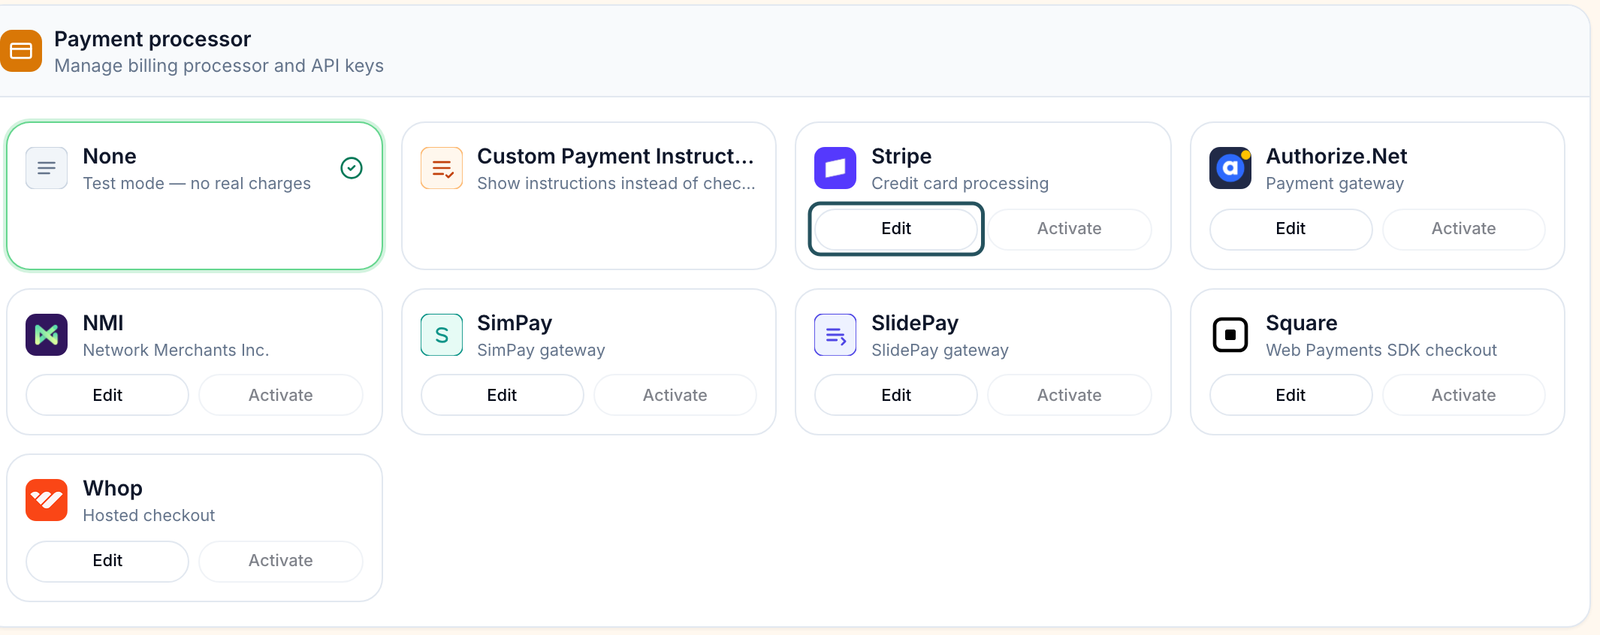
| Processor | Fields |
|---|---|
| Stripe | Publishable Key, Secret Key; the webhook registers itself |
| Authorize.Net | API Login ID, Transaction Key, Signature Key, Public Client Key; register the shown Webhook URL in Authorize.Net |
| NMI, SimPay, SlidePay | Private API Security Key, Public API Key / Tokenization Key; turn on Customer Vault in the gateway |
| Square | Application ID, Access Token, Location ID |
| Whop | API Key, Company ID |
Selling online: run one real purchase end to end before launch, then refund it. Saved-card renewals and refills need NMI-family gateways to have Customer Vault on.
Switch processors, or go back to test mode
Use this to move to a processor whose keys you already saved.
Activate it
Click Activate on its tile. Only one processor is live at a time.
Or stop charging
Click the None tile. Real charges stop at once, with no confirmation.
You'll know it worked when the toast reads Payment processor set to the name you chose.
Who can do this: Client Admin.
Show payment instructions instead of a card form
Use this if patients pay you by bank transfer or in person.
Write them
Click the Custom Payment Instructions tile, explain how to pay, then click Save instructions.
Make it live
Click the tile again.
You'll know it worked when the tile shows the green check and patients see your text at checkout. Orders stay unpaid until someone marks them paid on Orders.
Who can do this: Client Admin.
In a clinic: patients who pay at the desk don't need this. Take the card on your terminal and use Mark as paid on Orders.
Turn on Apple Pay (NMI only)
Use this to let patients pay with Apple Pay. You need NMI keys saved and verified, an active custom domain, and the Apple Pay domain verification file from your NMI merchant portal. You can upload the file before NMI is live; patients see Apple Pay at checkout only while NMI is the live processor. You upload the file yourself; there is no need to send it to Support.
Open NMI
Click Edit on the NMI tile. The Apple Pay section sits below the key fields. Under We publish it for Apple on: it lists your active custom domain.
Add the file
Click Choose file, or paste the file's text into Verification file. It starts {"version":1,"pspId":; a hex-encoded copy also works.
Save it
Click Save file in the Apple Pay section. Verify and update saves your keys, not the file.
Register each domain in NMI
In your NMI merchant portal, add every listed domain under Apple Pay and verify it. Apple accepts only domains registered there.
You'll know it worked when the toast reads Apple Pay verification file saved, the section shows On, and each domain becomes a link that opens the file. Patients using Safari on an Apple device with a card in Apple Wallet then see Apple Pay at checkout on those domains.
Who can do this: Client Admin. Affiliate accounts don't have this; their provider network sets it up.
Checkout on another website: GEN Health publishes the file only on custom domains it hosts. Embedded checkout loads inside your page from a GEN Health address, and Apple Pay shows only when that address is your custom domain. Apple also checks the page around it: put the same file at /.well-known/apple-developer-merchantid-domain-association on that website and add its domain in NMI too. A link or redirect to checkout needs neither. To replace the file, save a new one. To stop, click Turn off Apple Pay.
Check whether a patient paid
Use this when a patient says they paid and the order disagrees.
Find the charge
In Transaction History, type the patient or order into the search box. Status shows the processor's word, such as paid or unpaid.
Act on it
Row menu → View order, View patient, Copy reference (to find it in your processor) or Issue refund.
You'll know it worked when you can match the charge with your processor's dashboard.
Who can do this: Client Admin.
Statuses you'll see here
| Status | What it means | Who acts next | What you do |
|---|---|---|---|
| Green check and outline | The live processor | No one | Nothing |
| Saved / Verified | Keys stored, not live | You | Activate to switch |
| Verification failed | The keys didn't work | You | Re-copy them from the same environment |
| Missing keys / Missing content | Active but incomplete; checkout is broken | You | Edit and finish it |
What can go wrong
| What you see | Why | Fix |
|---|---|---|
| Patients check out but no money arrives, or checkout says test mode | None is active. | Connect and activate a real processor. |
| A red ! next to every product | No working processor is active. | Finish Connect. |
| NMI declines every card, or shows Customer Vault is not enabled | A key is wrong, or Customer Vault is off. | Paste both keys again; turn on Customer Vault in NMI. |
| Checkout says Payment setup is unavailable. Please contact support. | The processor rejected the saved keys, often expired ones. | Edit → Test connection; re-save; then contact Support. |
| Your processor (Payarc, USA Payments) isn't listed | Only the tiles shown are supported. | If it runs on NMI or Authorize.Net, use that tile with its keys. |
| A prescription says the pharmacy payment failed, but Billing shows nothing | Pharmacy charges are separate from patient charges. | Integrations → Update OnlyScripts payment method. |
| No Apple Pay section in the NMI form | NMI's keys aren't saved and verified. | Edit → Test connection → Verify and save, then reopen it. |
| Apple Pay needs an active custom domain. | No custom domain is active yet. | Connect one in Branding, URL, and custom domain. |
| This does not look like an Apple Pay domain verification file | The text isn't NMI's verification file. | Download it again from NMI's Apple Pay settings and paste it unchanged. |
| No Apple Pay button at checkout | NMI isn't live, the patient isn't on Safari with a Wallet card, or checkout opened on app.genhealthehr.com instead of your custom domain. | Check each. The domain link in the Apple Pay section shows whether the file is published. |
Questions people ask
Can we use Stripe and NMI together?
One processor is live at a time. Save keys for both and switch with Activate.
Do we need a processor if our own website charges patients?
No. Only charges taken through GEN Health checkout use it. Orders you create as already paid through the API don't.
Is this where GEN Health bills us?
No. Your GEN Health plan and card are in Settings → Account and billing.
Can GEN Health upload our Apple Pay verification file?
You upload it yourself in the NMI form, and GEN Health publishes it on your custom domain. See Turn on Apple Pay.
Related
Was this helpful?