Settings — Developers
Create API keys, subscribe a server to webhooks, and inspect what your integration actually did.
This settings tab is where your developer creates API keys, subscribes a server to webhooks, and inspects what your integration actually did.
Questions people ask about this page
How many tabs are there, and what are they called?
Five: Overview, API keys, Webhooks, Analytics, and Request Log. Storefront and Recent activity are not tabs — they are two of the four status tiles on the Overview tab. Older guides described them as cards; they are not clickable sections.
What is the difference between a Server key and a Storefront key?
The page states it above the table: "Server keys authenticate backend calls. Storefront keys authenticate hosted checkout and SDK embeds." A server key is a secret sent as X-API-Key and must never appear in a web page. A storefront key is public, sent as X-Storefront-Key, and only works from the web addresses you allow-list on it.
I found API keys on the Payments tab. Are those the same thing?
No, and this catches people out. The Payment processor card on Settings → Payments is described as "Manage billing processor and API keys" — those are your Stripe or Authorize.Net credentials, belonging to your payment company. The keys on this tab are GEN Health keys for your own software. See Connect your patient payment processor.
Why does one of my keys say Legacy?
Because it predates named keys. Your account can hold exactly one legacy credential, shown as Legacy API key. It cannot be renamed or regenerated — only revoked. Replace it with a named server key first.
Why can a storefront key show a lowercase active while a server key shows Active?
The two key types are stored differently, and the storefront row prints its raw value. Same meaning, different casing. Nothing is broken.
I lost a key. Can I look it up?
No. The reveal dialog says it plainly: "For security, this is the only time the full key is shown. Store it somewhere safe." The table only ever shows a masked version afterwards. If it is gone, use Regenerate — but be aware that stops the old value immediately.
My webhook endpoint says Auto-paused. What happened?
The platform paused it after repeated delivery failures, so it stops hammering a dead URL. Fix the endpoint, re-enable it, then use Send ping to prove it works.
What does the Warning filter mean in the Request Log?
A 4xx response — your request was rejected. Success is 2xx, Error is 5xx, and Unknown means no status was recorded. Open the row to read the response body.
Where to find it
Left menu → Settings → the Developers card. Direct link: /settings/developers. Visible to: Client Admin only. This tab exists on every client model, including Review Only.
Everything on this tab is live. Revoking or regenerating a key breaks any running integration the moment you confirm, and the confirmation is a plain browser prompt with no undo.
Two settings tabs mention API keys, and they are unrelated. This one holds GEN Health keys for your own software. Settings → Payments holds the payment processor's keys — its Payment processor card is described as "Manage billing processor and API keys", and those are your Stripe, Authorize.Net, NMI, SimPay, SlidePay, Square, or Whop credentials. If you came here looking for a Publishable Key or a Transaction Key, you want the Payments tab.
What is on this page
| What you see | What it does |
|---|---|
| Page heading Developers | Sub-line reads "API keys, logs, webhook subscriptions, and implementation references." |
| Documentation button, top right | Opens your developer documentation in a new browser tab at /{your-client-id}/api-docs. It is not a dialog. That page carries your logo and the word Developers, with Share, Get API Keys and Copy in its header, and six tabs: V2 API, V2 Guide, V1 API, Webhooks, Hosted Checkout, Patient Migration. It lands on V2 API, or on Webhooks if you were on the Webhooks tab when you clicked. The page is shareable: anyone with the link can read it without signing in. |
| Tab strip | Overview · API keys · Webhooks · Analytics · Request Log. |
Tab 1 — Overview
Card Overview, described as "Developer setup status for this client." Four status tiles, then a Quick links list.
| Tile | What it shows |
|---|---|
| API keys | How many keys exist. Hint: "Active server and storefront keys for this client." |
| Webhooks | The number of endpoints, or Not set. Hint when configured: "{n} enabled of {m} endpoints." Otherwise: "Add an endpoint to receive signed event deliveries." |
| Storefront | Ready or Needs setup. Hint: "Hosted checkout and SDK readiness, authenticated with X-Storefront-Key." |
| Recent activity | How many requests and webhook deliveries are currently loaded. |
Quick links, in order: Manage API keys ("Create, regenerate, and revoke keys."), Configure webhooks ("Endpoint, signing secret, and subscribed events."), Request log ("Inspect recent API and webhook activity."), API reference ("Endpoints, authentication, and examples.") and Hosted checkout & SDK ("Embed checkout and mount the SDK."). The first three switch tabs. The last two open the documentation in a new tab — and note where they land: API reference opens the V1 API tab, while the Documentation button opens V2 API. Hosted checkout & SDK opens the Hosted Checkout tab. Build against V2 unless someone has told you otherwise.
Tab 2 — API keys
Card API keys, search box Search keys, and a note above the table: "Server keys authenticate backend calls. Storefront keys authenticate hosted checkout and SDK embeds. Full keys are shown only once, at creation."
| Element | Detail |
|---|---|
| Columns | Name · Key (masked) · Type · Created · Status · actions |
| Type filter | Server · Storefront |
| Status filter | Active · Revoked · Legacy |
| Export CSV | Downloads the key list. Press and hold for the raw-data variant. |
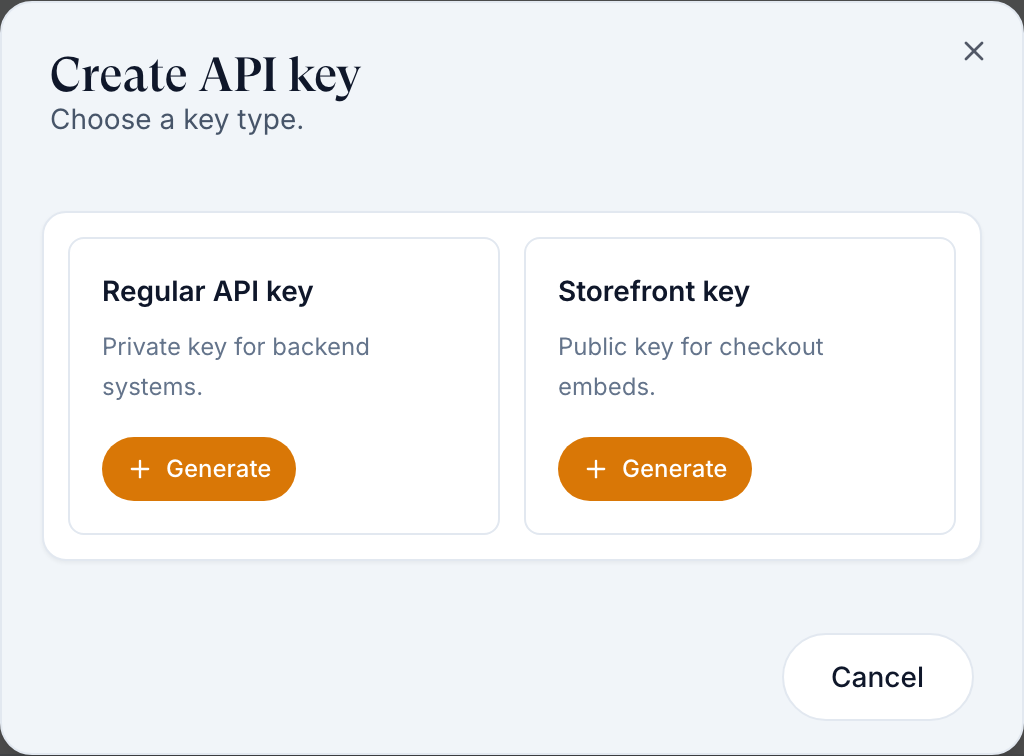
| Create key | Opens the Create API key dialog, "Choose a key type.", with Regular API key ("Private key for backend systems.") and Storefront key ("Public key for checkout embeds."), plus Cancel. |
| Row menu | Rename · Edit origins (storefront keys only) · Regenerate · Revoke. A legacy row offers only Revoke. |
| Storefront sub-line | Under the name: No allowed origins in amber, or "{n} allowed origins". |
| Empty state | "No API keys yet. Create your first key to start integrating." With filters on: "No keys match the current filters." |
| Two checkboxes below the table | Skip account setup and Use source custom field — see the settings table further down. |
Tab 3 — Webhooks
Card Webhook endpoints, count label "{n} of 10 · HTTPS URLs only", header button Add endpoint. Columns: Name · Status · Subscriptions · Secret · Health · actions. Row actions, in menu order: Edit, Send ping, Disable (it reads Enable on an endpoint that is off or auto-paused), Rotate secret, Delete. Toggling gives the toast Endpoint enabled or Endpoint disabled. Empty state: "No endpoints yet" / "Add an HTTPS endpoint to start receiving signed lifecycle events."
The Add endpoint dialog has Name (placeholder "e.g. Production CRM"), URL (placeholder "e.g. https://example.com/webhooks/gen-health", helper "Must be HTTPS and publicly reachable."), Enabled (helper "Disabled endpoints do not receive deliveries.") and Events. Footer: Cancel and Create endpoint — or Save changes when editing.
The event picker has two modes, All events and Selected events, a Search events box, and 53 events in 16 groups: Patient lifecycle, Form lifecycle, Order lifecycle, Recommendation lifecycle, Lab lifecycle, Async visit lifecycle, Sync/live visit lifecycle, Prescription lifecycle, Continuation, Uploads, Clinical review, Messaging, Products, Categories, Promo Codes, and Subscriptions. Each group header has a Select all / Clear all toggle.
Also on this tab: Webhook simulator — "Generate a signed sample payload, replay it with cURL, or send it to a saved endpoint."
Tab 4 — Analytics
Card Analytics with four tiles — Requests, Success rate, Avg duration, Webhooks — and a table Top endpoints with columns Endpoint, Requests, Success, Avg duration.
Tab 5 — Request Log
Card Request log: "Review the actual API path, version, key, and webhook activity for this client. Select a row for details." Search box Search logs. Columns: Type · Endpoint / path · API key · Status · Time. Type filter: API requests / Webhooks. Status filter: Success / Warning / Error / Unknown. Selecting a row opens a detail pane with Time, API version, API key, Duration, Webhook URL, Request and Response; before you pick one it reads No log selected. Up to 200 rows load at a time.
How to create a server key
Open the tab
In the left menu click Settings, then the Developers card. Click API keys in the tab strip.
Start the key
Click Create key in the top right. The Create API key dialog opens.
Choose the type
Pick Regular API key — "Private key for backend systems."
Copy it now
The Copy your key now dialog appears with the full value. Click the copy control (it changes from Copy to Copied), paste it straight into your secret store, then click Done. You will not see it again.
Rename it so you know what it is
New keys get an automatic name. Use the row menu → Rename to call it something like "Production CRM" so a future revoke is not a guessing game.
How to create a storefront key for your own website
Create the key
Create key → Storefront key ("Public key for checkout embeds."). Copy it from the Copy your key now dialog.
Lock it to your domain
The new row shows No allowed origins in amber. Open the row menu and choose Edit origins. A browser prompt reads "Enter allowed origins, comma separated". Enter the full origins, for example https://www.yourbrand.com, https://checkout.yourbrand.com.
Check the Overview tile
Return to Overview. The Storefront tile should read Ready rather than Needs setup.
Hand it to your developer
Click Documentation to open the docs in a new tab, then read Hosted Checkout and the SDK section. See also Put checkout on your own website.
How to add a webhook endpoint
Open the Webhooks tab
Click Webhooks in the tab strip, then Add endpoint.
Name and address it
Fill Name and URL. The URL must be HTTPS and publicly reachable — a localhost address will not work.
Choose events
Leave the mode on All events, or switch to Selected events and tick only what you need. Use Search events to jump to one, or a group's Select all.
Create it
Click Create endpoint. The Signing secret dialog appears: "Use this secret to verify webhook signatures from {name}. You can view it again anytime from the endpoints table." Copy it into your server config.
Prove it works
On the endpoint's row menu, click Send ping. A toast reads Ping delivered (HTTP 200) on success, or Ping failed with the code on failure.
Every setting on this page
| Setting | What it controls | Default |
|---|---|---|
| Create key → Regular API key | Creates a secret server key for backend calls, sent as X-API-Key. | — |
| Create key → Storefront key | Creates a public browser key for hosted checkout and SDK embeds, sent as X-Storefront-Key. | — |
| Rename | Changes the display name only. Not available on the legacy key. | Auto-generated name |
| Edit origins (storefront keys) | The comma-separated list of web origins that may use this key. Empty means no origin restriction is configured, shown as No allowed origins. | Empty |
| Regenerate | Issues a new value and invalidates the old one instantly. | — |
| Revoke | Switches the key off permanently. | — |
| Skip account setup (checkbox) | "When enabled, patients created through the API do not have to complete account setup before using the portal. Use this only when your API payload already collects the required onboarding details." | Off |
| Use source custom field (checkbox) | "Maps a patient custom field into the Patients page Source column." When on, a Custom field key box appears with the placeholder "e.g. source". | Off |
| Custom field key (text) | Which custom field the Source column reads before falling back to API. Save it with the tick beside the field. | Empty |
| Add endpoint → Name | Display name for the webhook endpoint. The legacy default endpoint cannot be renamed. | Empty |
| Add endpoint → URL | Where deliveries are posted. HTTPS only. | Empty |
| Add endpoint → Enabled | Off means the endpoint receives no deliveries at all. | On |
| Add endpoint → Events | All events, or a hand-picked subset from 53 events in 16 groups. | All events |
| Edit (endpoint) | Reopens the same form as Add endpoint, titled Edit endpoint. Footer button reads Save changes. | — |
| Enable / Disable (endpoint) | Stops or resumes deliveries without deleting the endpoint. Also how you bring an Auto-paused endpoint back. | Enabled |
| Reveal / copy signing secret | The Secret column shows dots with an eye button (Reveal secret for {name}) and a copy button (Copy secret for {name}). The secret is readable any time — unlike an API key. | Hidden |
| Rotate secret | Issues a new signing secret. The dialog is titled Rotate signing secret? and the previous secret becomes invalid at once. | — |
| Send ping | Delivers a test payload so you can confirm your server accepts it. | — |
| Delete (endpoint) | Removes the endpoint. Dialog: Delete endpoint? | — |
| Endpoint limit | 10 endpoints per client. At the limit the button tooltip reads "Limit of 10 endpoints reached. Delete one to add another." | 10 |
Not on this tab: rate limits, IP allow-listing for server keys, per-key permission scopes, and key expiry dates. None of those exist.
Statuses you will see here
| Status | What it means | What to do |
|---|---|---|
| Active (server key) | The key works. | Nothing. |
active (storefront key, lowercase) | The same thing. Storefront rows print their raw stored value. | Nothing. |
| Revoked | Switched off. Every call using it now fails. | Create a replacement and update your integration. |
| Legacy | The single pre-named-keys credential, shown as "Legacy API key". Cannot be renamed or regenerated. | Migrate to a named key, then revoke it. |
| No allowed origins (amber sub-line) | A storefront key with no origin restriction configured. | Use Edit origins to add your site. |
| Enabled / Disabled (endpoint) | Whether the endpoint receives deliveries. | Toggle from the row menu. |
| Auto-paused (endpoint) | The platform paused it after repeated failures. | Fix the URL or the handler, re-enable, then Send ping. |
| Legacy (endpoint chip) | A pre-multi-endpoint configuration. | Nothing, but it cannot be renamed. |
| Delivered / Failed / Pending / Published / Skipped (paused) | One webhook delivery attempt. | Open the delivery for attempts, HTTP status, and next attempt. |
| Success (Request Log) | 2xx. | Nothing. |
| Warning (Request Log) | 4xx — your request was rejected. The underlying value is not the word "warning", so do not search for it in an export. | Open the row and read the response. |
| Error (Request Log) | 5xx. | Retry, then open a ticket if it persists. |
| Unknown | No status was recorded. | Open the row. |
| Ready / Needs setup (Storefront tile) | Whether hosted checkout and the SDK are usable. | Create a storefront key and add allowed origins. |
| Not set (Webhooks tile) | No endpoints exist. | Add one on the Webhooks tab. |
What can go wrong
| What you see | Why | Fix |
|---|---|---|
| An integration stops the second you click Revoke or Regenerate | Both take effect immediately. The browser prompt warns you: "Existing integrations using this key will stop immediately." | Create the new key first, deploy it, and only then revoke the old one. |
| You cannot find a key you just made | Full keys are shown once, at creation. | Regenerate, and store the new value straight away. |
| Browser checkout returns a 401 or 403 | The storefront key has no allowed origins, or the origin does not match exactly — protocol and subdomain included. | Edit origins and add the exact origin your page is served from. |
| An endpoint never fires | It is disabled, auto-paused, subscribed to the wrong events, or not publicly reachable. | Check the Status and Subscriptions columns, then Send ping. |
| Add endpoint is greyed out | You have 10 endpoints. | Delete one you no longer use. |
| Signature checks fail after a rotate | The previous secret is invalid the moment you rotate. | Deploy the new secret, then rotate — not the other way round. |
| You expected a confirmation dialog and got a plain browser box | Revoke and regenerate use native browser prompts, not styled dialogs. | Read the text carefully — there is no undo. |
| Patients created by API get stuck on onboarding | Skip account setup is off, so they must complete setup themselves. | Turn it on only if your API payload already sends first name, last name, phone, date of birth, and address. |
| The Source column on Patients just says API | Use source custom field is off, or the custom field key does not match your payload. | Turn it on and set the exact key you send. |
Next
Was this helpful?