Labs and lab requirements
Price and publish the lab tests patients can buy, and make a lab a requirement that holds an order until results arrive.
/labs is where a Client Admin prices and publishes the lab panels patients can buy, and it is the catalogue a product draws on when you make a lab required before treatment.
Questions people ask about this page
What does "required lab" actually mean?
It is a setting on a product, not on the lab. Open the product, switch on Requires labs, and pick the approved lab options. From then on the patient's order for that product is held until an accepted result exists. The order sits at Pending Labs for your team and shows Labs Needed to the patient.
Why is there a banner asking for a payment method?
The banner reads "Please update your account payment method to enable labs." with a Set up payment method button. Lab processing fees are charged to your account card, not the patient's, so GEN Health will not let a lab be enabled or sold until that card is on file. The same block appears as the dialog Platform payment method required.
Create Lab says no labs are available. What now?
The dialog asks Which lab is this panel for? and, when nothing is switched on, says "No activated labs are available. A Super Admin must activate a lab in Integrations before you can create one." You cannot fix this yourself. Ask GEN Health support, or your provider network, to activate a lab vendor for your account.
What is the difference between Cost and Patient total?
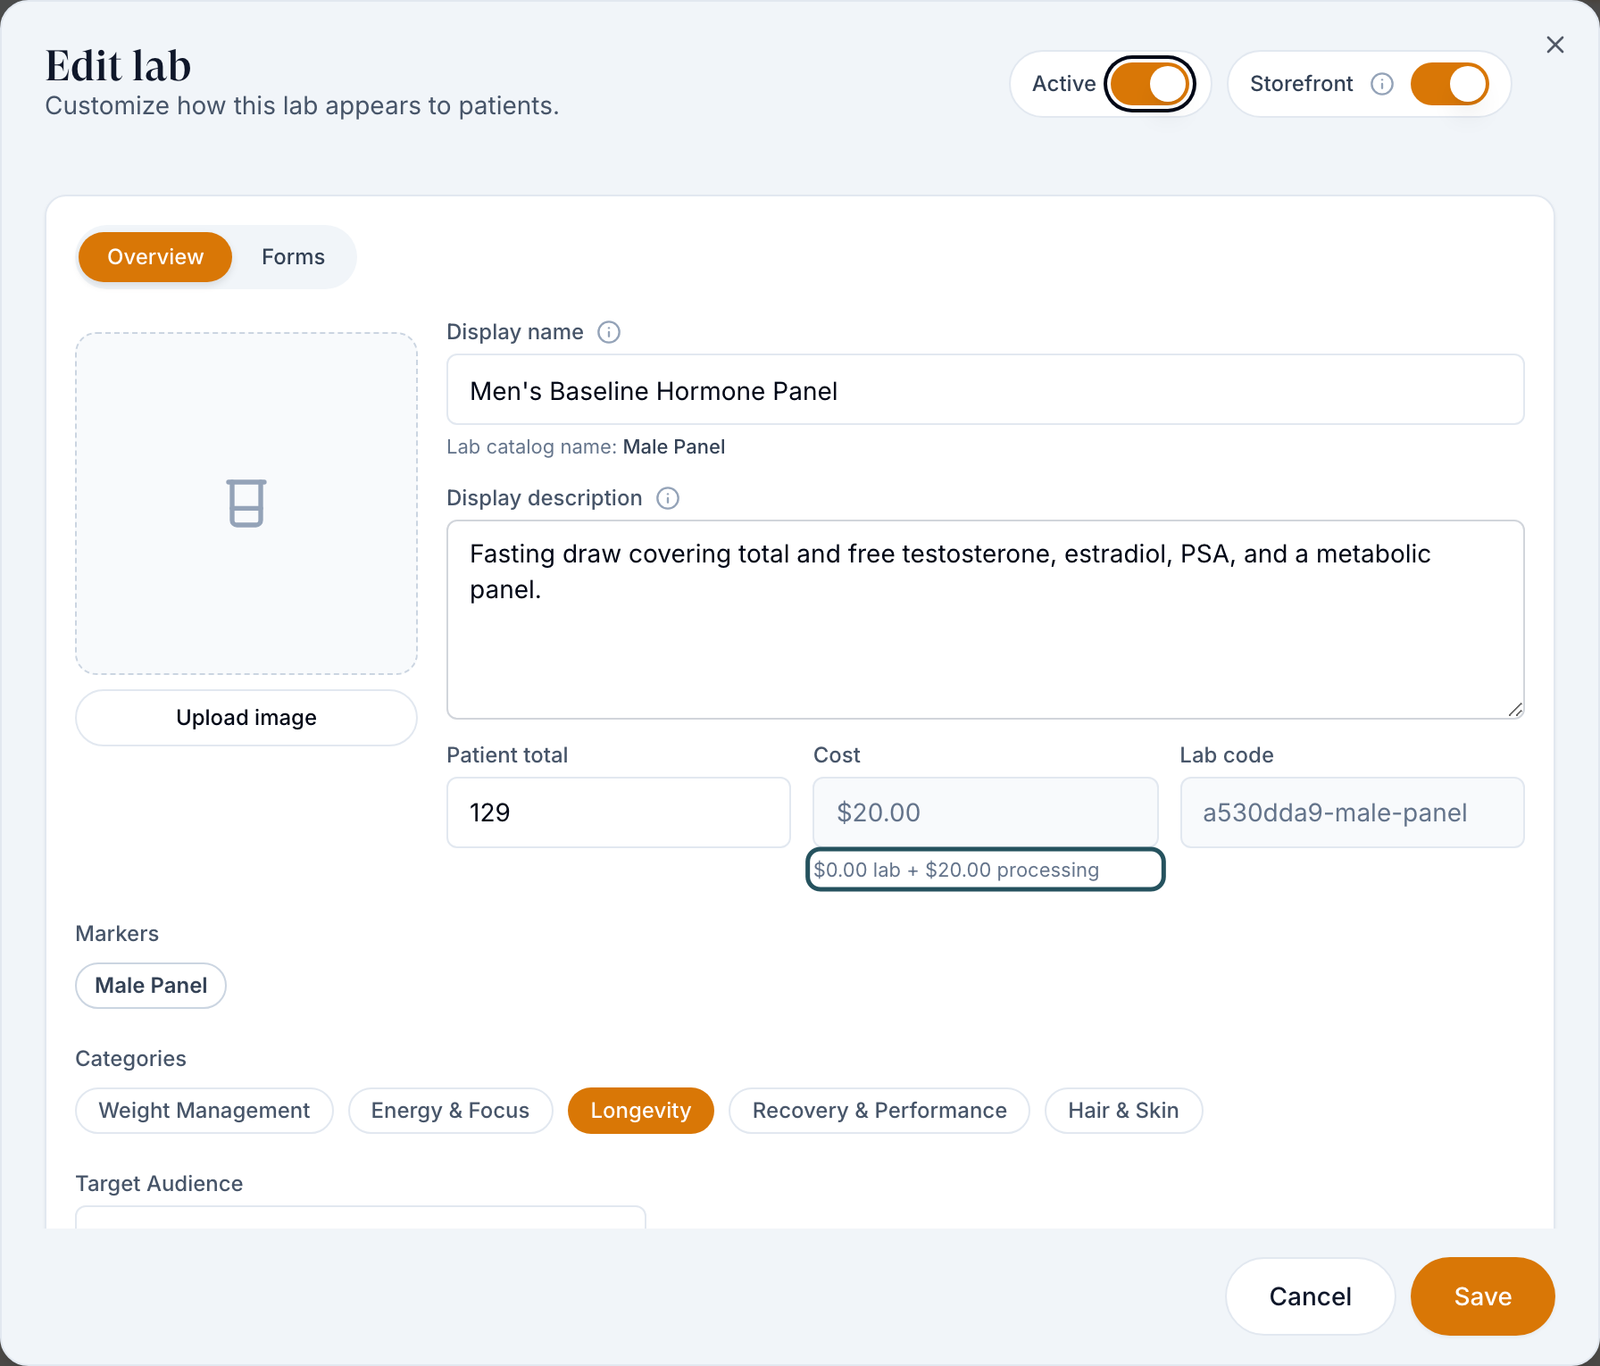
Cost is what you are charged, broken down in the editor as "$0.00 lab + $20.00 processing". Patient total is the single price the patient pays. Set Patient total above Cost or you lose money on every order.
The patient uploaded their own results. Do they still have to buy the lab?
Not if you allow uploads. The patient's answer to "Have you had labs done in the last {period}?" routes them either to Upload your recent lab results or to Order an approved lab. An upload is held for your team: the order reads Results Awaiting Review and someone has to Accept result or Decline. Declining sends the patient back to buying the lab.
Can Client Staff set lab prices?
No — but they can do more here than you might expect. A Client Staff user gets Create Lab, Bulk, the row menu, and the Edit lab dialog, and can change Display name, Display description, the image, Lab code, Categories, Active and Storefront. What is simply not rendered for them is the money and the reach: Patient total, Cost, Target Audience and Unavailable states are absent from their editor, and the toolbar has no Promo Codes. Their row menu also drops Linked products.
Where to find it
Left menu → Labs. Direct link: /labs. Visible to: Client Admin (full control) and Client Staff (everything except money — see below). Review-only clients do not have this page. Heading Labs, subtitle "Manage patient lab access. Both public and signed-in access are enabled by default."
What is on this page
| What you see | What it does |
|---|---|
| Set up payment method banner | Appears until your account card is on file. Until then labs cannot be enabled or sold. |
| Create Lab | Opens Which lab is this panel for? — you pick from the lab vendors activated for your account. |
| Bulk | Select several labs, then set status, price, or categories in one go. |
| Promo Codes | The same discount manager as Products. |
| Storefront / Table | Swaps the table for the card grid patients see. |
| Categories | The browse groups, shared with Products. |
| Export CSV | Downloads the rows currently shown. |
Search labs... | Searches the display name. |
| Filters | All statuses · Categories · Markers · Target audience · Price · Setup · Vendor · Collection. |
| Columns | Status · Image · Name · Category · Markers · Target Audience · Cost · Patient Total · Actions. |
| Status cell | Two switches per row: Deactivate: {lab} and Hide from storefront: {lab}. The chips read Active and Storefront. |
| Row link icon | Checkout link for {lab} — a direct link you can share. |
| Row ⋯ menu | Open actions for {lab}: Edit details, Preview, Send to patient, Linked products, Duplicate, Hide from storefront, Deactivate. |
How to publish a lab
Clear the payment block first
If the banner says "Please update your account payment method to enable labs.", click Set up payment method and add the card. Nothing below works until this is done.
Create the lab
Click Create Lab. The dialog asks Which lab is this panel for? — pick the vendor panel you want to sell. If it says "No activated labs are available.", stop and ask GEN Health support to activate a lab vendor. To back out, click Cancel: pressing Escape leaves this dialog open and blocks everything behind it.
Open the editor
On the lab's row, click the ⋯ button (Open actions for {lab}) and choose Edit details. The dialog is Edit lab — "Customize how this lab appears to patients."
Write what patients read
Set Display name and Display description. The vendor's own wording is shown underneath as "Lab catalog name: …". Click Upload image to add a picture.
Price it
Type the Patient total. Read Cost first — it breaks down as "$0.00 lab + $20.00 processing", and the processing part is charged to your account card.
Set who sees it
Pick the Categories patients browse by and a Target Audience. The helper is explicit: "Patients filter the lab catalog by this. "Any" shows this lab to everyone." Use Unavailable states to hide it where you cannot serve — "Patients in selected states cannot see or order this lab."
Check the markers
Markers lists what the panel measures, for example Comp. Metabolic Panel (14). Patients and providers both read this, so make sure it matches what you are selling.
Attach forms if you need them
Switch to the Forms tab in the same dialog to see the forms this lab requires.
Turn it on
Switch on Active at the top of the dialog, then Storefront so patients can find it. Click Save.
Do the rest in bulk
Back on the table, click Bulk, tick the labs you want, and use the bulk panel to set their status, price, or categories in one action instead of opening each editor.
How to make a lab required
This is set on the product, not here. There are three ways in, and they all write the same thing.
Per product
Open Products, open the product, and on the Overview tab switch on Requires labs — "Select accepted labs and patient prices." Pick which of your labs count as an acceptable result.
For many products at once
On Products, click Bulk, tick the products, then Set required labs. The popover is headed Requires labs and holds an Approved lab options list. If it says "No eligible lab catalog offers.", you have no active labs to approve yet.
For a whole category
On Products → Categories, edit a category and use its Labs required setting. Every product in the category inherits it. A badge reading Set by {owner} means your provider network set it and you cannot loosen it.
In Config view
On Products, click Config view and tick Requires labs in the grid. The tooltip: "Requires labs before completion. Enabling this checks that eligible lab options exist and applies approved labs."
What a required lab actually blocks, and how it clears
Once a product requires labs, buying it does not finish the job. The order is held and the patient is walked through a lab gate.
| Stage | What the operator sees on the order | What the patient sees | Who has to move |
|---|---|---|---|
| Product bought, nothing chosen yet | Pending Labs | Step Labs needed; the gate asks "Have you had labs done in the last {period}?" with Yes, I have recent results and No, I need to order labs | The patient |
| Patient chose to buy a lab but has not paid | The requirement reads awaiting lab purchase; the parent still shows Pending Labs | Order an approved lab (or Order your lab when uploads are not allowed) | The patient |
| Patient already has results on their chart | — | A card headed Results already on your chart | The patient picks one |
| Patient uploaded a PDF | Results Awaiting Review; the parent shows Results under review; row action Review uploaded result | "Your care team is checking the result you uploaded. Nothing is needed from you right now." | Client Admin or Client Staff: Accept result or Decline |
| A real lab order is running | Sent to Lab | Step Labs ordered — "Your lab is ordered. Check your lab order for collection details — results reach your care team automatically." | Nobody. Do not chase the patient. |
| Results arrived | Results Received, with the button Review Results | Step Results received | Client Admin: Mark as Reviewed |
| Requirement met | The lab order reads Lab Results Reviewed; the held product order is released | Step Reviewed — "Your care team accepted your results." | Nobody — the parent order moves on to payment, forms, or provider review |
Declining an uploaded result does not cancel anything. It puts the requirement back to "the patient needs to buy a lab", and the patient is asked again.
The optional review gate before a lab is sent
Settings → Portal experience → Experience settings has a switch called Review lab orders before sending. With it on, a paid lab order is parked instead of going straight to the vendor.
- The order reads Awaiting Lab Review, and the Orders filter chip is Lab Review.
- A Client Admin opens Review lab and chooses Release to lab, Change order, or Cancel lab.
- Client Staff see the same row read-only, labelled Awaiting review.
Leave it off unless you genuinely want to check every lab by hand — nothing reaches the vendor until someone releases it.
Statuses you will see here and on the lab order
| Status | What it means | What to do |
|---|---|---|
| Active | Chip on the lab row. The lab can be bought. | Nothing. |
| Storefront | Chip on the lab row. Patients see it when they browse. Without it, only a direct checkout link reaches it. | Nothing. |
| Payment processor missing | Warning icon on the name. No card processor is connected, so nothing can be bought. | Connect a processor on Billing. |
| Pending Payment | The lab request exists but is unpaid. Every lab a provider requests starts here. | The patient pays, or uploads a result if you allow it. |
| Pending (filter chip Pending (Processing)) | The patient paid, but the order is held because the GEN Health processing fee failed on your account card. | Update your account card. The patient does nothing. |
| Pending Forms | Paid, but required intake is outstanding. | The patient completes the forms. |
| Awaiting Lab Review | Held for your sign-off because Review lab orders before sending is on. | Client Admin: Review lab → Release to lab. |
| Results Awaiting Review | The patient uploaded their own result and it needs a human decision. | Accept result or Decline. |
| Sent to Lab | Accepted by the vendor. It stays here for the whole kit journey. | Wait. |
| Partial Results | Some markers are back, the lab is still working. | Wait. |
| Results Received | Final results are in and attached to the patient record. | Client Admin: Mark as Reviewed. |
| Lab Results Reviewed | Someone attested they read the results. Terminal. | Nothing. |
| Cancelled | Voided by the patient, an admin, or the vendor. | A held product order goes back to needing a lab. |
| Error | Dispatch or vendor processing failed. The patient just sees Processing. | Your team fixes it; the patient cannot act. |
Five different things on this platform are called "review". Awaiting Lab Review is you approving that a lab may be sent. Results Awaiting Review is you accepting a patient's upload. Results Received → Mark as Reviewed is you attesting you read connector results. Pending Review is a provider reviewing the order clinically. None of them substitute for another.
At-home kits: the extra journey
For test-kit panels the order status stays on Sent to Lab the whole time, and a second, finer status tracks the kit. Operators see Kit Ordered → Preparing Kit → Shipped to Patient → With Patient → Returning to Lab → Received at Lab → Partial Results → Results Ready. A kit phase never goes backwards. The patient is emailed at exactly three of them: when the kit ships, when it is delivered, and when their sample is on its way back. If something goes wrong they see Shipping delay or Kit could not be delivered without the order status changing.
What can go wrong
| What you see | Why | Fix |
|---|---|---|
| Create Lab opens to "No activated labs are available." | No lab vendor is switched on for your account. Only a Super Admin can do that. | Raise a ticket from Support and ask for a lab vendor to be activated. |
| The dialog Platform payment method required blocks you. | "A GEN Health platform payment method is required before lab products can be enabled or sold." | Click Add payment method and add your account card. |
| The dialog Approved labs required appears when you tick Requires labs. | The product has no acceptable lab options selected. | Click Edit product and choose the approved labs. |
| The dialog Network labs not configured appears. | Your provider network has not set the labs up on their side. | Ask your network contact. |
| A patient's order is stuck at Pending Labs for days. | The requirement is waiting on the patient, and there is no automatic chase. | Open their profile → Labs tab → Request Lab, or message them. |
| Lab orders never leave your queue. | Review lab orders before sending is switched on and nobody is releasing them. | Work the Lab Review filter on Orders, or switch the setting off. |
| A lab shows Sent to Lab and nothing changes for a week. | Kit journeys sit under that one status; some vendors also report delays that produce no status change at all. | Open the order and read the kit phase and tracking link. |
| You cannot find a way to withhold a result from a patient. | There is none. Patients see every result on their own record once it is filed. | Message the patient before the result lands if the news is difficult. |
Next
Was this helpful?